.png)
 3 hours ago
2
3 hours ago
2
ARTICLE AD BOX
Helium (HNT), a rising star in the world of cryptocurrencies, has gained significant traction since its launch. Its decentralized wireless network and real-world utility attract many investors. We’ll show you simple, fast, and secure ways to buy and store Helium (HNT). To keep things short, we think that Coinbase is the best option to buy Helium (HNT). Why Coinbase?
- Coinbase is trusted by BlackRock and has a Deposit protection.
- Coinbase has super low fees and is almost an industry leader in this category.
- Coinbase has the best customer support in the industry according to our tests.
Exchange |  |  | ||||
Rating | ||||||
Fees | 0,15% | 0,10% | 0,99% | 1,5% | 1% | 1% |
Cost per $1,000 | $1,50 | $1 | $9,90 | $14,90 | $10,00 | $10,00 |
Cost per $100,000 | $150 | $100 | $990 | $1,500 | $1,000 | $1,000 |
Transfer to external wallet | ||||||
Security | ||||||
Details | Trusted by BlackRock | Super low fees | Big portfolio | Secure but expansive | Fast verification | Variety of Memecoins |
Link |
Buy Helium n Coinbase
Coinbase is a regulated crypto custodian with licenses around the world. This means Coinbase meets strict security standards and is supervised by financial authorities. Even BlackRock, the world’s largest asset manager, entrusts Coinbase with the custody of digital assets for its crypto ETFs. This speaks to the extremely high level of security Coinbase provides.
While you have the flexibility to use external wallets, Coinbase provides a highly secure environment for storing your HNT. Unlike some platforms that impose delays on withdrawals, Coinbase processes them immediately, giving you quick access to your funds.
Cost-effectiveness is another advantage. Coinbase’s fees are remarkably competitive at 0.15%, significantly lower than the industry average. To put this into perspective, other platforms may charge up to 1.5% for crypto transactions.
Coinbase prioritizes user security with features like two-factor authentication, adding an extra layer of protection to your account. They also offer customer support, typically responding within 24 hours. (We can personally vouch for their support team’s efficiency and helpfulness.)
The platform itself is designed with user-friendliness in mind. Its intuitive interface caters to both novice and experienced traders. And with dedicated apps for Android and iOS devices, you can manage your HNT portfolio and execute trades conveniently from anywhere.
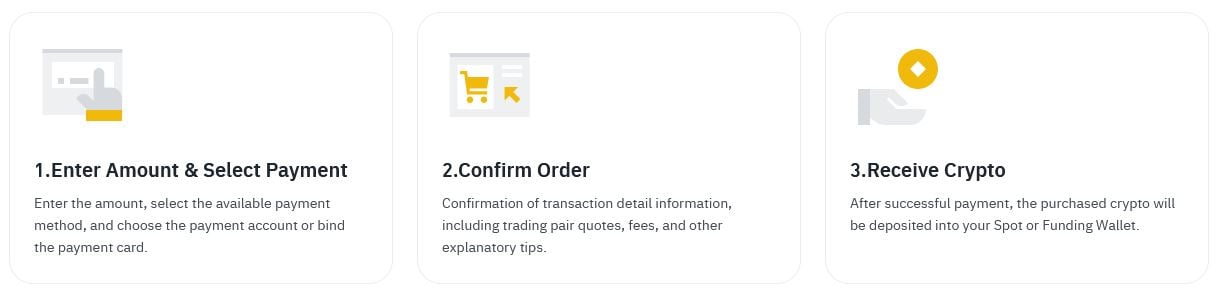
Coinbase is one of the most popular and user-friendly platforms to buy Helium Network Token (HNT). Here’s how you can buy HNT easily, securely, and quickly on Coinbase.
Step 1: Sign Up for Coinbase
Before you can start buying HNT, you need to create an account on Coinbase. Visit Coinbase.com and click “Get Started.” You will be prompted to enter your name, email, and a password. Once completed, click “Create Account.”

Step 2: Verify Your Identity
Coinbase requires you to verify your identity in order to comply with regulatory requirements. You will need to upload a government-issued ID and provide personal details like your address and date of birth. This process may take a few minutes to complete.
Step 3: Add a Payment Method
To buy HNT, you need to link a payment method. Coinbase supports several options, including:
- Bank Account: Link your bank account for lower fees and higher transaction limits.
- Credit or Debit Card: Ideal for faster purchases, though fees are typically higher than bank transfers.
- PayPal: Coinbase also supports PayPal for deposits and withdrawals in certain countries.
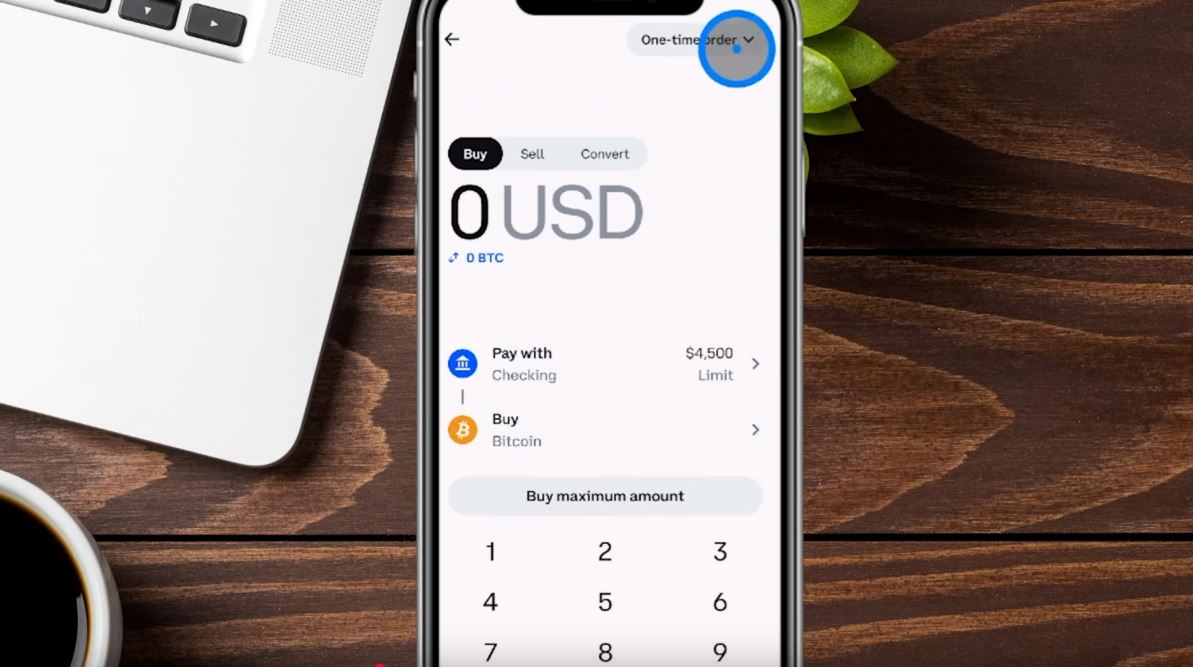
Step 4: Buy HNT
Once your account is set up and your payment method is linked, you’re ready to buy HNT!
- On the Coinbase dashboard, navigate to the “Buy/Sell” section.
- Select Helium Network Token (HNT) from the list of available cryptocurrencies.
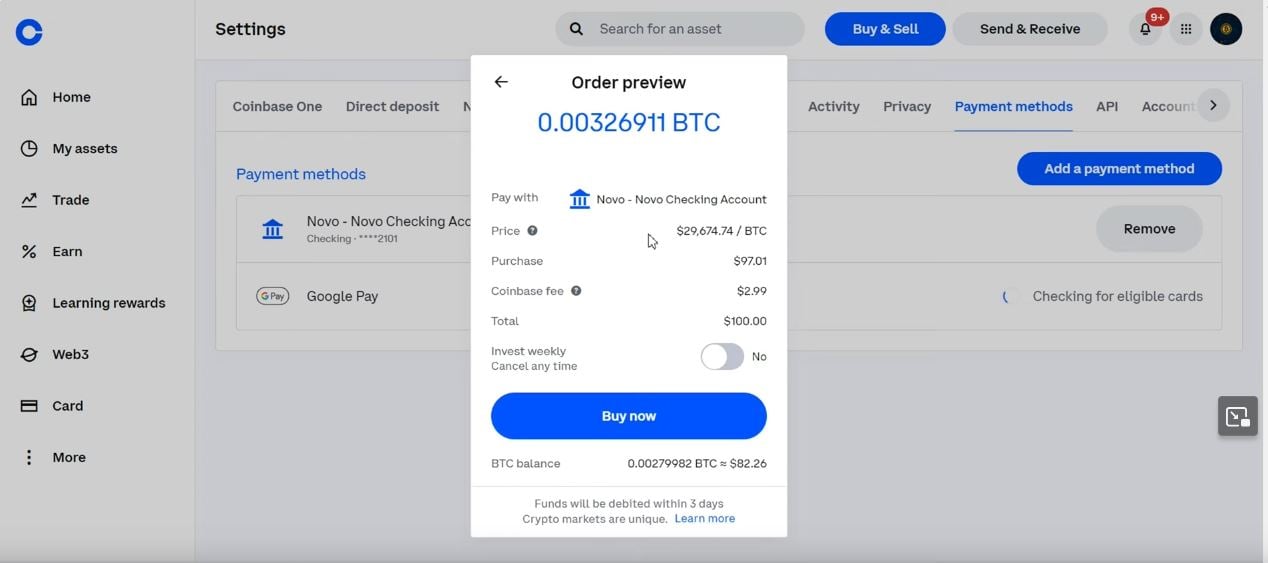
- Enter the amount of HNT you wish to purchase, either in your local currency (e.g., USD, EUR) or HNT.
- Choose your payment method (e.g., bank account, credit card).
- Review the transaction details, including any fees, and click “Buy Now” to complete the purchase.
Step 5: Store Your HNT Securely
After purchasing HNT, it will be stored in your Coinbase wallet. For added security, it’s recommended to transfer your HNT to a personal wallet (such as a hardware wallet from Ledger or Trezor) rather than keeping it on Coinbase, which is an online exchange.

Benefits of Buying HNT on Coinbase:
- User-Friendly Interface: Coinbase is known for its intuitive design, making it easy for beginners to navigate.
- High Security: Coinbase uses industry-standard security measures such as two-factor authentication (2FA) and insurance for funds held in the Coinbase Vault.
- Wide Payment Options: Coinbase supports multiple payment methods, including bank transfers, credit cards, and PayPal.
Buy Helium on Binance
![]()
Binance is one of the world’s largest and most popular cryptocurrency exchanges, known for its high security and user-friendly platform. You can now easily purchase Helium Network Token (HNT) using a credit card or trade HNT using different cryptocurrencies. In this guide, we’ll walk you through both options!
Step 1: Register on Binance
Unlike many other exchanges, Binance offers the option to verify your identity. This is not mandatory, but completing the verification process will allow you to increase your daily withdrawal limit. Without verification, the daily limit is lower, but you can still use all the other platform features.
Step 2: Buy HNT with a Credit Card
To buy HNT via credit card on Binance, follow these steps:
- Navigate to the Credit Card Section: In the top menu, click on “Buy Crypto” and then select “Buy with Credit Card.”
- Select Your Payment Currency: Choose Helium Network Token (HNT) as your cryptocurrency and select your payment currency (Euro, USD, etc.).
- Enter Your Personal Information: Fill in your details in the provided fields.
- Verify Email and Phone Number: You will need to verify your email and phone number using a code.
- Proceed to Payment: After verification, click “Next” to enter your credit card information.
- Upload ID for Verification: To complete the process, upload the front and back of your passport to verify your identity.
Important Notes Before and After Your Purchase
- HNT Price Fluctuation: The HNT amount displayed is based on the current price and may change. If the rate fluctuates significantly, you may be asked to reconfirm the transaction.
- Transaction Fees: Binance’s third-party payment processors may charge a transaction fee.
- Transaction Limits: Daily and monthly limits apply to purchases, depending on your verification level.
- Track Payment Status: After completing your purchase, you can check your payment status and deposit history in your Binance account.
Step 3: How to Trade HNT on Binance
If you already have other cryptocurrencies such as Ethereum (ETH), Binance Coin (BNB), Ripple (XRP), or Tether (USDT), you can deposit them into your Binance account and trade them for HNT. Here’s how to exchange Ethereum (ETH) for HNT:
- Deposit Ethereum (ETH): If you already have Ethereum (ETH) on another exchange or wallet, you can directly send it to your Binance Ethereum wallet address.
- Access the Deposit Section: Once logged in, click on “Wallet” in the navigation bar and then select “Deposit.”
- Find Your Ethereum Wallet Address: In the search box, type “ETH” and select “Ethereum” from the list. You will see your unique Ethereum wallet address, which you can use to transfer your Ethereum to Binance.
- Exchange Ethereum for HNT: Once your Ethereum has arrived in your Binance account, you can trade it for HNT by going to the “Markets” tab, selecting “ETH/HNT,” and placing an order.
Additional Trading Tips
- Leverage Trading: Binance also offers margin trading with leverage for advanced users, allowing you to amplify your trades and maximize potential profits (with higher risk). Make sure to fully understand leverage before using this feature.
- Security: Ensure you activate two-factor authentication (2FA) to protect your account. Binance offers various security features like cold storage for crypto funds and insurance coverage in case of major losses.
Buy Helium on Kraken
![]()
Kraken is a regulated crypto custodian with licenses across various jurisdictions globally. This means Kraken adheres to stringent security standards and is overseen by financial authorities, ensuring the safety of your assets. Kraken is trusted by institutional investors, including major entities in the financial world, for the custody of cryptocurrencies, which highlights the extremely high level of security Kraken provides.
Kraken offers the flexibility to use external wallets, but it also provides a highly secure environment for storing your HNT. Unlike some platforms, Kraken processes withdrawals swiftly, allowing you to access your funds promptly.
When it comes to cost-effectiveness, Kraken’s fees are highly competitive. The platform’s trading fees are structured in a tiered manner, with the lowest fees reaching 0.16% for makers and 0.26% for takers, which are notably lower than many competitors in the market.
User security is a top priority at Kraken, with features such as two-factor authentication (2FA) and advanced encryption to protect your account. The platform also offers customer support that typically responds quickly, providing assistance whenever needed.
Kraken is designed to be user-friendly, accommodating both beginners and advanced traders. Its intuitive interface is complemented by mobile apps for both Android and iOS devices, enabling you to manage your HNT portfolio and execute trades conveniently on the go.
Kraken is one of the most trusted and secure platforms to buy Helium Network Token (HNT). Here’s how you can buy HNT securely and efficiently on Kraken.
Step 1: Sign Up for Kraken
To get started with buying HNT, create an account on Kraken’s platform. Visit Kraken.com and click on “Create Account.” You will be asked to enter your name, email, and create a secure password. Once completed, click “Create Account.”
Step 2: Verify Your Identity
Kraken requires you to verify your identity to comply with financial regulations. You will need to upload a government-issued ID and provide personal details such as your address and date of birth. This verification process is necessary for your security and may take a few minutes to complete.
Step 3: Add a Payment Method
To buy HNT, you must link a payment method. Kraken supports several payment options, including:
- Bank Account: For lower fees and higher transaction limits.
- Credit or Debit Card: Ideal for faster purchases, though fees tend to be slightly higher than bank transfers.
- Wire Transfers: For larger purchases, Kraken also supports wire transfers in several countries.
Step 4: Buy HNT
Once your account is set up and a payment method is linked, you’re ready to buy HNT!
- On the Kraken dashboard, go to the “Buy Crypto” section.
- Select Helium Network Token (HNT) from the list of cryptocurrencies.
- Enter the amount of HNT you’d like to purchase, either in your local currency (e.g., USD, EUR) or in HNT.
- Choose your payment method (e.g., bank account, debit card).
- Review the transaction details, including any fees, and click “Buy Now” to finalize your purchase.
Step 5: Store Your HNT Securely
After purchasing HNT, it will be stored in your Kraken wallet. For enhanced security, it’s recommended to transfer your HNT to a personal wallet, such as a hardware wallet (e.g., Ledger or Trezor), rather than keeping it on Kraken, an online exchange.
Benefits of Buying HNT on Kraken:
- User-Friendly Interface: Kraken is known for its clear and easy-to-navigate design, making it simple for beginners to use.
- High Security: Kraken employs top-tier security measures such as two-factor authentication (2FA) and provides insurance for funds held in its vault.
- Competitive Fees: Kraken offers low, competitive fees, making it an attractive option for both small and large transactions.
- Multiple Payment Options: Kraken supports various payment methods, including bank transfers, credit cards, and wire transfers, to cater to different user needs.
Buy Helium on Kriptomat
About Kriptomat
In contrast to the established broker eToro, Kriptomat is a comparatively young crypto exchange, but no less trustworthy. On Kriptomat you can buy over 30 cryptocurrencies directly via Euro, USD, etc., including Helium Network Token (HNT), and also send them directly to an external wallet. It is important to know that trading is currently restricted to Europe, so investors from, for example, the USA are not allowed to use the platform.
The focus is on an easy-to-use and modern user interface that allows anyone to buy and trade cryptocurrencies. Therefore, Kriptomat is our top recommendation, especially for beginners! As far as seriousness is concerned, Kriptomat can convince with two licenses from the Estonian government.
Furthermore, there is another unbeatable advantage of Kriptomat: the fees. In contrast to other exchanges and brokers, Kriptomat does not charge a price premium. Your purchase price corresponds to the spot price of HNT. Kriptomat only charges a nominal fee for each transaction. The calculated fees are always displayed transparently during the creation of the buy order.
Set up an HNT account on Kriptomat
First of all, you should know that Kriptomat adheres very closely to the legal requirements of the European Union and therefore requires complete verification of your identity. In order to buy HNT on Kriptomat, you first need to create an account. To do so, go to the official website kriptomat.io and click on the orange “Register” button. This will open a pop-up window where you have to enter your first and last name, an email address, and a password for the exchange.
Kriptomat will then send you an e-mail with a confirmation link. By clicking on the link, you verify your account. As soon as you have done this, you can log in to your Kriptomat account with the access data you have just entered. However, at this point, you are not yet finished with the registration.
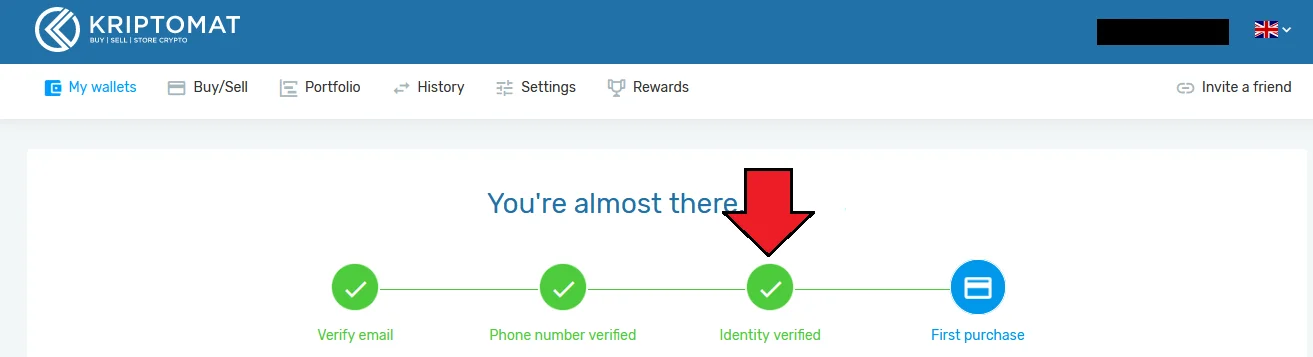
Before you can buy HNT and use further features of the exchange, you have to enter and verify your phone number. Kriptomat will send you an SMS containing a verification code that you have to enter on the website. However, the registration process is not yet complete. Due to the strict EU guidelines, you still have to reveal your full identity. To start the process, simply click on the corresponding prompt (see screenshot).
A new pop-up will then open in which you must first enter your address (street, house number, city, country). You will also need to upload a photo or scan of your passport or ID card. Kriptomat provides an elegant and fast solution for this. You can easily continue the registration process on your smartphone. Just click on the link, and Kriptomat will send you an SMS with a link to continue the process.
You can then take a photo of your ID (front and back) with your smartphone and upload it immediately. The same applies to the final step. To verify your identity, Kriptomat would like a selfie from you. You can allow Kriptomat to access your camera from your smartphone and take a selfie directly.
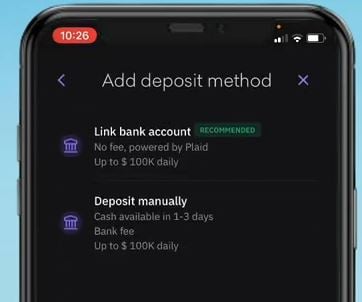
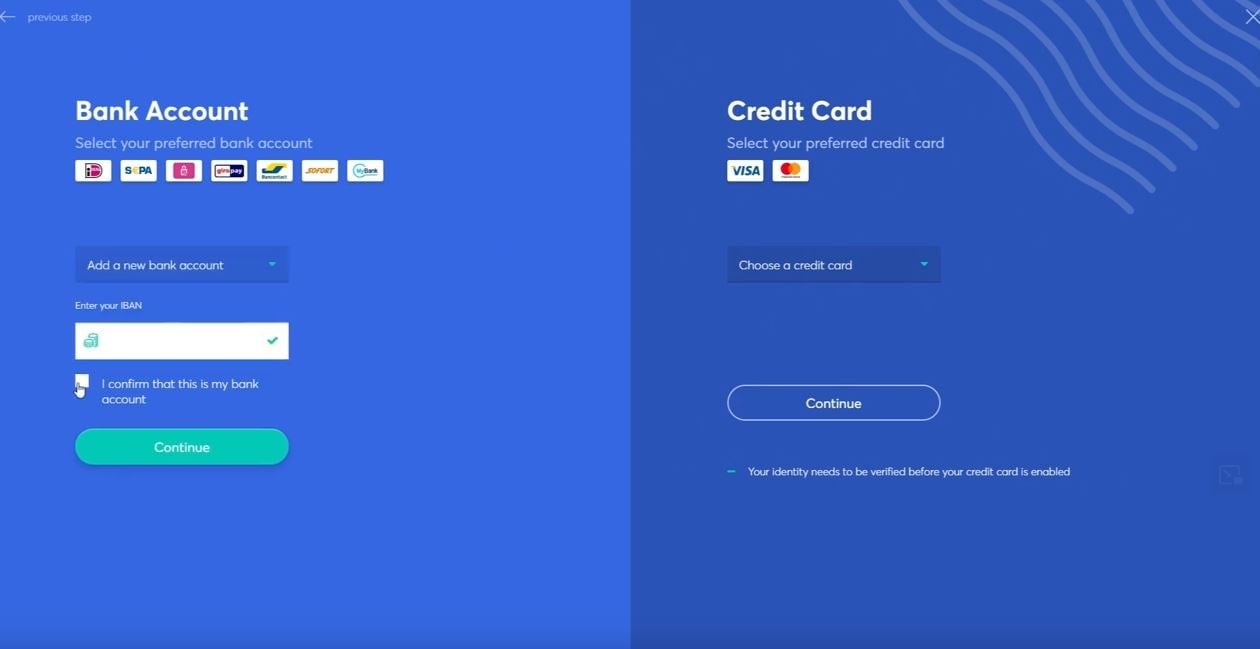
If you want to buy cryptocurrencies via SEPA bank transfer, it is also necessary to add a bank account to your Kriptomat account in the last step. You can then deposit money via SEPA and then use your “credit” to buy HNT and other cryptocurrencies. If you use Neteller, Skrill, or your credit card, this is not necessary. Once you have completed the registration process described above, the following purchase limits are available to you. There is no distinction between different verification levels, as on other crypto exchanges, because you have already completed the full verification.
Buy HNT on Kriptomat
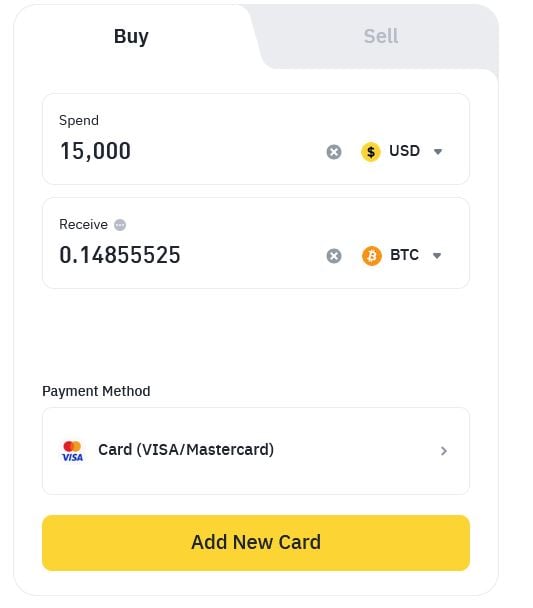
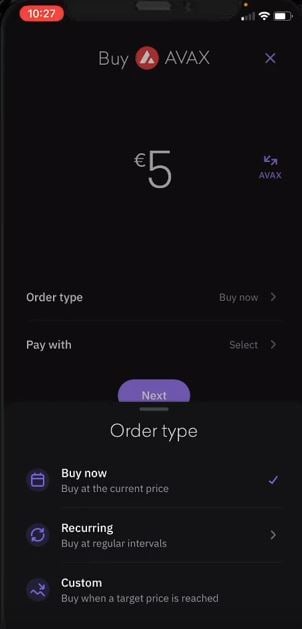
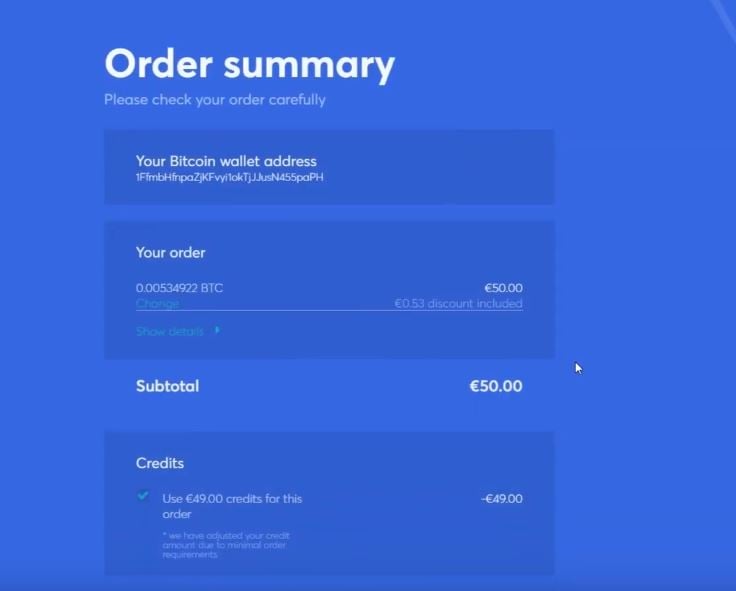
Buying HNT on Kriptomat is very simple and intuitive. First, go to the tab “Buy/Sell” (step 1) and then select the tab “Buy” (step 2). In the now visible area below, you can select Helium Network Token (HNT) to buy it.
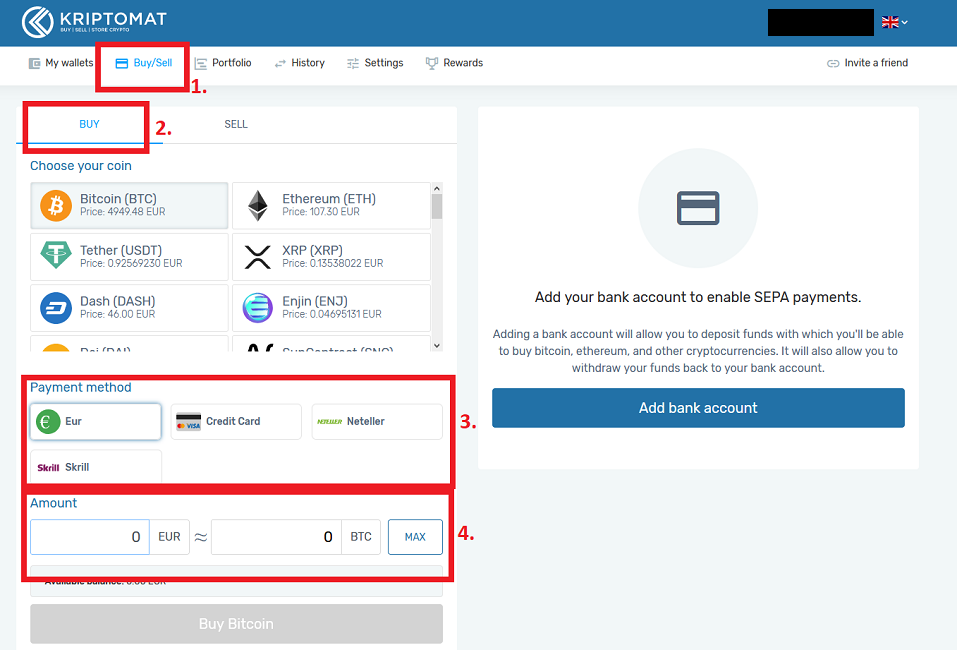
You can then choose from four different payment methods (step 3). While you need to add a bank account to your Kriptomat account to make a deposit via “Eur”, i.e., SEPA bank transfer, the other three options (credit card, Neteller, Skrill) allow you to purchase immediately without having to enter any further data.
In the fourth step (see screenshot), you only have to enter your purchase amount for HNT. After you click on “Buy HNT,” you will see the transaction fees for the order. To finalize the purchase, you must click “Confirm transaction.”
Kriptomat will then confirm the purchase and redirect you to your “My Wallet” section. Within a few seconds, your purchase amount will be displayed here. A good summary of the purchase process is also provided in the following video tutorial:
Buy Helium at Anycoin
![]()
Anycoin is a popular cryptocurrency exchange platform that offers a simple and secure way to buy and sell Helium Network Token (HNT) and other cryptocurrencies. It caters to both beginners and more experienced traders, providing an intuitive interface and a variety of features designed to make crypto trading easier and more secure.
Key Features of Anycoin:
- User-Friendly Interface: Anycoin offers a straightforward and clean platform, making it easy for new users to start trading and for more experienced traders to access advanced features.
- Wide Selection of Cryptocurrencies: Anycoin supports a range of cryptocurrencies including Helium Network Token (HNT), Bitcoin (BTC), Ethereum (ETH), Litecoin (LTC), and more, allowing you to diversify your portfolio easily.
- High Security Standards: Security is a priority for Anycoin, with features like two-factor authentication (2FA) and SSL encryption to protect user accounts and transactions. This ensures your crypto holdings are safe from external threats.
- Low Fees: Anycoin aims to provide competitive fees for trading and transactions, making it an attractive option for those looking to minimize costs while trading digital assets.
- Multiple Payment Methods: Users can purchase cryptocurrencies using various payment methods, including bank transfers, credit cards, and sometimes even PayPal, depending on their location.
- Fast Transactions: Anycoin processes transactions quickly, allowing users to purchase cryptocurrencies without long delays. This quick access to funds is a major benefit for those who need to act fast in the market.
- Support for Wallets: While Anycoin provides its own wallet to store your crypto assets, it’s also recommended to use your own personal wallet for added security. This can include hardware wallets or other types of secure storage.
- Dedicated Customer Support: Anycoin offers customer support, providing assistance with any issues or inquiries that might arise during your experience on the platform.
- Mobile Apps: Anycoin has apps available for both Android and iOS devices, making it easy to manage your portfolio and execute trades on the go.
How to Buy HNT on Anycoin:
- Create an Account: Start by visiting the Anycoin website and clicking on “Sign Up.” Enter your name, email address, and create a password. Afterward, you’ll receive a verification email to confirm your account.
- Verify Your Identity: Anycoin will ask you to complete a verification process to comply with regulatory requirements. This may involve submitting a government-issued ID and some personal information.
- Link a Payment Method: To buy HNT, link a payment method to your account. Anycoin supports various payment options like bank transfers, credit cards, and PayPal.
- Make Your Purchase: Once your account is verified and your payment method is linked, go to the “Buy” section, select Helium Network Token (HNT), and enter the amount you wish to purchase. Review the transaction details and fees, then complete your purchase.
- Store Your HNT Securely: After buying HNT, it will be stored in your Anycoin wallet. However, for extra security, it’s recommended to transfer your crypto to a personal wallet (e.g., a hardware wallet) for safe storage.
Benefits of Using Anycoin:
- Simple and Easy to Use: With its user-friendly interface, Anycoin makes cryptocurrency trading accessible to everyone, including beginners.
- Secure Platform: Advanced security measures, including 2FA and SSL encryption, help ensure your funds are safe.
- Variety of Cryptocurrencies: You can easily buy Helium Network Token (HNT) and other major cryptocurrencies on Anycoin.
- Competitive Fees: Anycoin offers low transaction fees, making it a cost-effective platform for crypto trading.
- Quick Transactions: The platform processes transactions quickly, providing fast access to your purchased assets.
Buy Helium at ByBit
![]()
Bybit is a popular cryptocurrency exchange platform that specializes in trading digital assets such as Helium Network Token (HNT), Bitcoin (BTC), Ethereum (ETH), and other cryptocurrencies. Known for its advanced features and high liquidity, Bybit is primarily used by more experienced traders, especially those interested in leveraging trading and derivatives.
Key Features of Bybit:
- Advanced Trading Tools: Bybit offers a range of professional trading tools including spot trading, margin trading, and derivatives trading (futures contracts). The platform also provides advanced charting features and technical analysis tools to help users make informed decisions.
- High Liquidity: Bybit is known for its high liquidity, which is particularly beneficial for traders who need to execute large trades without significant slippage. This makes it a reliable platform for both day traders and those looking for long-term positions.
- Leverage Trading: One of Bybit’s standout features is its leverage trading options. Users can trade with leverage, enabling them to amplify their positions and increase potential profits. However, this also comes with higher risks, and it’s important to use leverage cautiously.
- User-Friendly Interface: Despite offering advanced trading options, Bybit maintains an intuitive and user-friendly interface, making it accessible for both beginner and experienced traders. The platform’s clean design helps users navigate the various trading tools easily.
- Security Features: Bybit places a strong emphasis on security with features such as two-factor authentication (2FA), cold storage for crypto assets, and an insurance fund to cover any potential losses during extreme market conditions. These measures help ensure the safety of user funds.
- Mobile App: Bybit offers mobile apps for both Android and iOS, allowing users to trade and manage their crypto assets on the go. The mobile apps have many of the same features as the desktop platform, providing flexibility for traders who need to stay connected to the markets at all times.
- Fast Transactions: Bybit offers quick and seamless transactions, with order execution speeds often cited as one of the fastest in the industry. This ensures that trades are executed without delay, which is crucial in volatile markets.
- Referral Program: Bybit has a referral program that allows users to earn rewards by inviting others to join the platform. This is a great way for traders to earn additional income while growing the community.
- Customer Support: Bybit provides 24/7 customer support to help users with any issues or questions. The platform offers support through live chat, email, and other communication channels, ensuring that help is readily available.
How to Buy HNT on Bybit:
- Create an Account: Start by visiting the Bybit website and clicking “Sign Up.” You’ll need to provide your email address and create a secure password. After registering, you will receive a verification email to activate your account.
- Verify Your Identity: To comply with regulatory standards, Bybit may ask you to complete a KYC (Know Your Customer) verification process. This can involve uploading a government-issued ID and some personal information to verify your identity.
- Deposit Funds: Once your account is set up, you need to fund your account. Bybit supports deposits in several cryptocurrencies, including Bitcoin, Ethereum, USDT (Tether), and more. You can deposit these digital assets directly into your Bybit wallet.
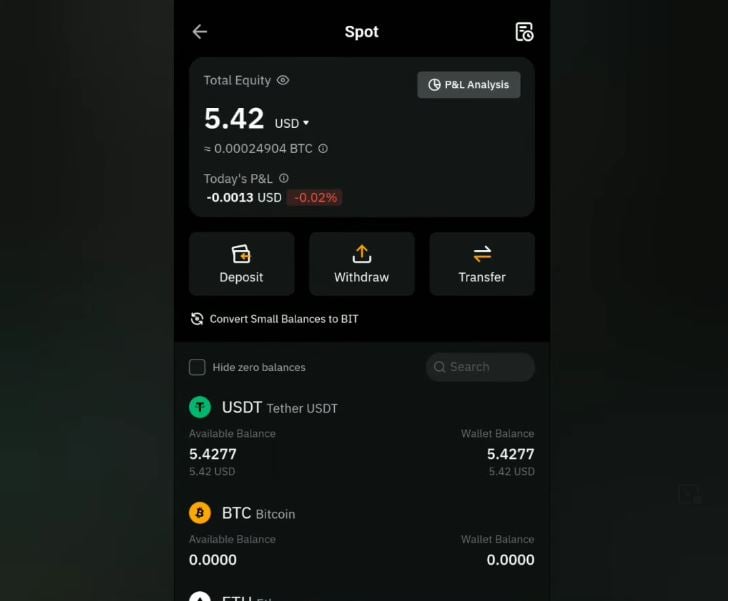
- Buy HNT: To buy Helium Network Token (HNT) on Bybit:
- Navigate to the “Spot” trading section on the platform.
- Select Helium Network Token (HNT) as the cryptocurrency you wish to purchase.
- Choose your trading pair (e.g., HNT/USDT).
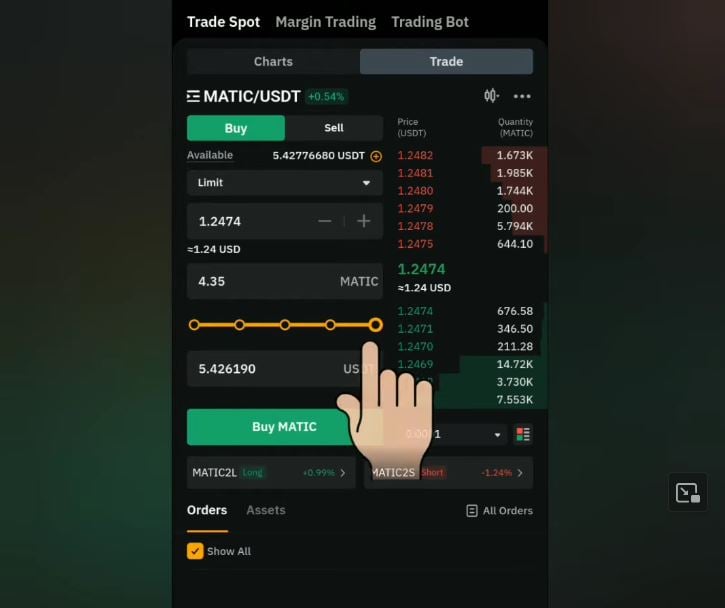
- Enter the amount you want to buy and review the transaction details.
- Confirm the purchase to complete the transaction.
- Store Your HNT: After purchasing HNT, you can store it in your Bybit wallet. However, for added security, it’s recommended to transfer your HNT to a private wallet, such as a hardware wallet (e.g., Ledger or Trezor), rather than keeping it on the exchange.
Benefits of Using Bybit:
- Advanced Trading Options: Bybit is ideal for traders looking for advanced features like margin trading and leverage, along with access to a wide range of crypto assets.
- Fast Execution and High Liquidity: The platform provides fast order execution and deep liquidity, which is crucial for active traders in fast-moving markets.
- Security: Bybit prioritizes user security with features like two-factor authentication (2FA), cold storage, and an insurance fund.
- Mobile Trading: Bybit’s mobile apps allow users to trade and monitor their portfolios from anywhere.
- Competitive Fees: Bybit offers competitive trading fees, making it an attractive option for traders looking to minimize costs.
- 24/7 Support: Bybit provides round-the-clock customer support to help resolve any issues or concerns quickly.
Best Helium wallet: Electrum
When using a desktop wallet, we have had very good experiences with the Helium (HNT) Electrum Wallet. We will show you briefly how to download and use it. First, you have to go to the official site and download the wallet (click!). If you click on the link, you will get to the website where you can download the wallet. Scroll down a bit and then click on the button “Download Electrum“.
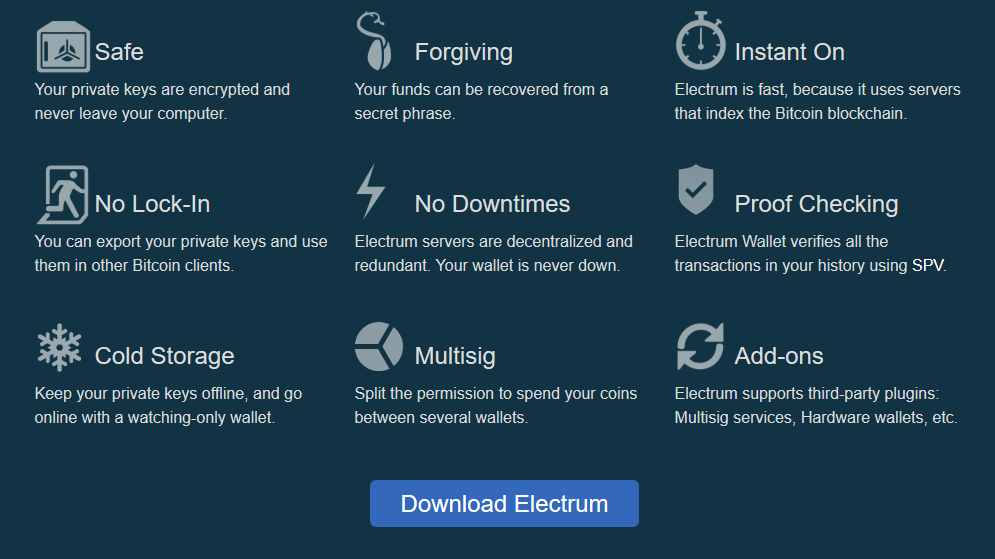
Now you will land on a page where you have to choose the appropriate wallet for your operating system. If you are using Windows, you will need to download the Wallet version for Windows. For example, if you are a Windows user, click on “Windows Installer” (see picture: red arrow). If you want the app for Android, you need to select this installer accordingly:

When the file is downloaded, click on the setup file. Select a directory where the wallet should be installed and click on “Install”. The installation should not take longer than 2 minutes. When the installation is complete, click “Close”.
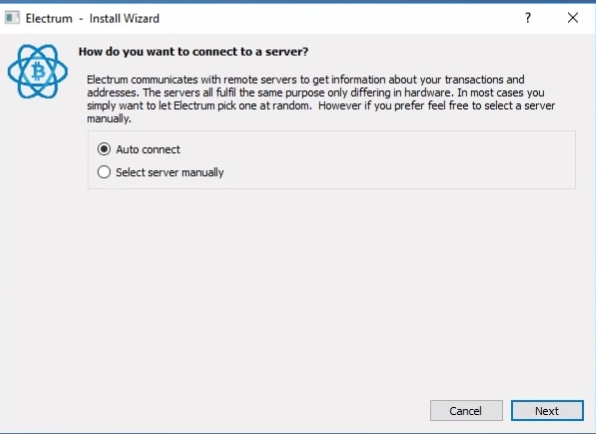
Congratulations: the wallet is installed. Now you start the Helium Electrum Wallet by double-clicking the Electrum icon on the desktop. First, the software will ask you how you want to connect to a server. As a beginner, we recommend that you select “Auto connect” at this point.
The Electrum software will then detect that you have not yet created a wallet. At this point, you simply have to click “Continue” and can give the wallet another name if necessary. Then you have the possibility to set up different types of wallets. If you feel that setting up the wallet till now is difficult, we recommend that you choose the “Standard wallet” at this point at the beginning. The wallet in the standard version is completely free of charge and works very well.
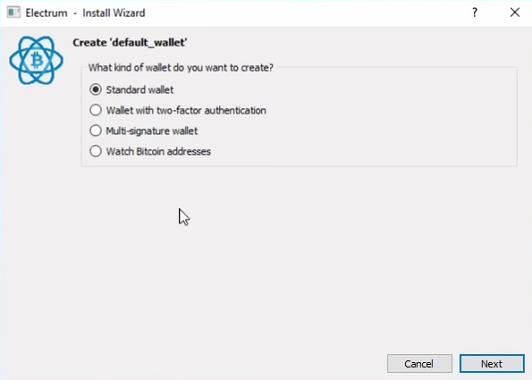
Otherwise, it is safer to create a “Wallet with two-factor authentication“. You’ll need a smartphone and the Google Authenticator app, which you can find on the App Store and Google Playstore. If you want to use the wallet with two-factor authentication, it also costs some money. You must decide for yourself whether you want to invest that money or not. We can just recommend you to do it because it increases the safety of your wallet by a lot.
If you have now clicked on “Next”, a new seed must be generated. The seed also depends on the address form. We recommend the “Segwit” setting, as this is the most common address form compared to the old format. Then you’ll see your seed. This is a bunch of 12 words, which is your key to the wallet if you lose your password or your computer breaks down. Therefore, it is extremely important that you note down the seed somewhere safe, preferably on a piece of paper which you keep safe.
In the next step, you will be asked to enter the seed again. If you have also done so successfully, Electrum will ask you to create a password. The longer, the better. Also remember to use numbers and special characters. You will use the password every time you open the wallet. Therefore, also keep the password safe.
Now you are ready for the actual user interface of the Electrum Wallet. The “Receiving Address” you had to enter at an exchange can be found in the upper right corner under the column “Receive“. You have to copy this address and enter it at the exchange as “Receiving Address”. Once you have entered the receiving address of the Helium Electrum Wallet, all you have to do is select a payment method at the exchange and then click “buy”. In general, the transaction should be credited to your wallet within 24 hours.
If you have any questions, feel free to write us a comment, we will be happy to help you!


 English (US)